

Table of Contents
Process improvement is a technique, a skill, an approach and a methodology that is highly in demand. It is one of those activities that can deliver so many benefits to an organisation. From reducing waste to reducing the cost of doing business, reducing the errors and issues plaguing your teams and your operational performance, simple process improvement activities can ripple out across your business, improving all it touches along the way.
Knowing this, it is not a surprise so many people now want to know how they can deploy process improvement rapidly. The approach many people know can sometimes take quite a bit of time. You need to define the process, identify the scope, map it out end to end, understand where the problems lie, interview those involved, work out solutions for fixes etc. Much of this can take some time, time many businesses feel as though they don’t have.
Luckily for those who want to deliver rapid process improvement, there is a way to do this, and that is what we are going to explore in this article.
Definition of rapid process improvement

Given that process improvements can take a long time to identify and deliver, especially in wider projects, it is important we define the term rapid here first. For us, rapid refers to something being done in a much quicker time than was originally expected. If you are dealing with an issue that needs resolving and you have given it 4 weeks to be completed, setting a 2-week goal would be an example of a rapid change. If you originally wanted to have a process changed within 2 weeks and you change it to 1 week, you’ve gone rapid.
It is like those types of projects that require rounds of testing and parallel runs. Those that have 2 or 3 rounds and runs are fully-fledged projects which take their time. Those that have 1 or in some cases none, these are rapid delivery projects.
When it comes to process improvement:
Rapid process improvement means the identification, defining, scoping, mapping, solutions for, improvement and controlling of a process in less than was / would have been originally planned for. A rapid process improvement would typically take place within 5 business days, end to end.
Given that definition, let’s look at how you would go about deploying rapid process improvement.
Deploying Rapid Process Improvement
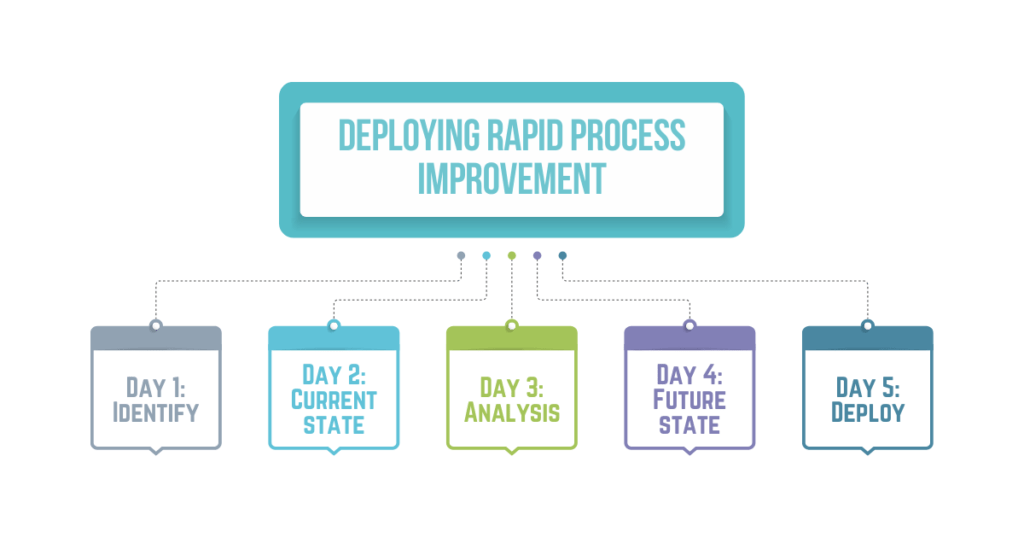
Day 1: Identify
Identify the process
What is the process you are looking to improve? Here you want to be clear on the name of the process so you are clear on what you need to map and improve. You would be specific, such as “End of month Payroll Reporting Process”. The more specific, the better.
Identify the scope
This ties in with the previous point, and the more specific you are with the name of the process, the easier the definition of scope will be. You want to ensure you don’t go down any rabbit holes and start mapping, improving or solutions for other processes not in scope. You want to clearly identify “in scope for this work is the End of month Payroll Reporting Process”, with all other interlinking processes out of scope.
Identify the team
You need to be clear quickly on who is going to be involved in this work, who is going to help you may, identify solutions, problems and waste etc. These will often be a handful of those people involved in the delivery of the process, who are close enough to it to help you to map it out in full. (Some people get tripped up here and involved only in Management as it is a rapid process improvement, and therefore holds more risk. However, Management often do not know what the process looks like in practice and, therefore cannot help with the mapping).
Identify materials already available
If there are already process maps, training materials, and SOPs (Standard Operating Procedures) available, use them. Someone can start to map out at a higher level what the process looks like, saving you time in your process mapping session to focus on the analysis and solution part, not just mapping.
Identify and assess any data or insight already available
Is there anything available within the business from an issue or error log perspective which would indicate to you at this stage what problems the process is facing? Have there been any customer complaints, employee concerns raised, errors or problems recorded in logs? All of this information is useful to know at this stage and will frame the conversations that are to come later on.
Identify the aims & purpose with those involved
You want to ensure you meet with those team members who will be involved here to set the scene, ensure they understand what the aim and the purpose of this work is and what level of involvement they will have. This will give them the ability to plan their diaries accordingly and not impact BAU (business as usual) work in any way.
Day 2: Current state
Map the current state process
Get everyone into a workshop (in person or virtually) and map the current state process. Here you will use some form of mapping tool (Visio, BPMN, Nimbus etc.) to map out the process in scope for this work in full. They will need to map the activities, the teams or departments involved, the hands-offs, rework loops and bottlenecks, decision points, starting and ending points etc. Every activity, interaction and transaction within the process will need to be documented to ensure you can truly improve the process later on.
Suggested tool: Swimlane Map/ Flowchart Map
Discuss problems and issues
Once the map is completed, you then want to speak openly with the team about the problems and issues they face with this process. What waste do they see? What manual interventions do they have which take up too much time? Where do errors appear on their reports, from their systems, in their data? Which handoffs to other departments are taking too much time? Where can they see critical mistakes which are leading to quality issues with the service, product or output of the process? Where do their own biggest frustrations lie? All of this information is critical and must be captured.
Suggested tool to use here: Affinity Diagram
Overlay problems and issues
With all of the problems and issues now laid out clearly for all to see, you can overlay these onto your process map. This will help with the process analysis you are to conduct at a later date. Here you can show physically on the map where errors are coming from (! Symbols), where people can get stuck in rework loops (loop symbols) and where a lot of time is wasted waiting for activities to be completed (clock symbols). You can also colour code to highlight critical problem areas, make notes and comments and add further time or financial information if required.
Day 3: Analysis
Conduct process analysis
Adding on to what was done on day 2, the analysis of the process map will continue. Here you want to identify where in your process you have waste and where you have opportunities. This is known as identifying the value add and non-value adding activities within your process. As part of this analysis, you can colour code those steps which add value in green, don’t add value in red and those that are required (legal, governance etc.) in amber. This will then give you a great visual representation of the amount of waste and opportunity that exists in your current state process.
Run a solutions workshop
Now you have all of your required information and analysis, you can start to make some informed decisions about the types of solutions that would be right for this process. This will require a workshop to enable the team to brainstorm a range of different solution ideas, with all being potential solutions, and options to be discussed further. These solutions must be tied to the purpose of this work, whether that be a reduction in process waste, a reduction in errors and issues faced by the process or improving the quality of output.
Overlay the improvement suggestions
As done with the errors and issues, now you overlay the suggested improvements or solutions onto your process map. This exercise will help you see if any proposed solutions or improvements may not work out, may clash with others that have been suggested or need further work on them before they are fit for purpose. You can do this work on a fresh map (without the errors or issues on them) or on top of these, removing the issues and errors as you move through the map, showing how the solutions proposed would remove the issues faced. You could amend any times or costings you may have also added to your map to show the wider benefits of these changes.
Day 4: Future state
Conduct gap analysis
Here you want to remove any of those steps, activities or handoffs you have identified as wasteful and unnecessary. You can remove them and place them to one side, ensuring that their removal doesn’t cause wider problems for the business. The aim of the gap analysis is to ensure that if you were to conduct your process without the wasteful and unnecessary steps, you could still produce your product or output, as expected, with the expected quality intact. If the answer to this is no, you can then work out which solutions you could deploy to try and assist with this (i.e. rather than putting wasteful steps back in, they are automated).
Related: Gap Analysis
Select your solutions
Given your confidence in what changes are needed to your process, you can now confidently choose your solutions. Here you will dive into the solutions discussed on the previous day and work out which ones are going to help you achieve your goals – reducing waste, stopping errors and improving the quality of output of your process. This will involve having a discussion and potentially prioritising solution based on need, cost and time taken to deploy. If you are looking for true rapid process improvement, you will opt to prioritise those that can be deployed quickly.
Suggested tool to use here: Solution Selection Matrix
Map out future state process
Now you have conducted your gap analysis, chosen your solutions and know exactly what needs to be done to get from your starting point to your endpoint quicker, leaner and with fewer issues, you can map out your future state process. This is going to be the process replacing your current state process, and you will be documenting it in the same way you documented your current state process. This is going to be shared more widely across your stakeholders so it’ll need to be correct and have the right level of detail necessary.
Day 5: Deploy
Deploy your improvements
If you want to get this activity done in one day, this is possible. One of the benefits of mapping out and solutions with the team directly involved in the process is that they are now fully aware of the changes and improvements proposed, what these will involve and how they are going to be deployed, so they can nearly hit the ground running. On this day, you can ask that the team update the training materials and SOPs, spend a 1 – 2 hour session running through the new material (if required) and ask them to familiarise themselves with the content over a period of X amount of time.
(It goes without saying, if you are deploying changes which include new systems or wide-scale changes, these will take longer to deploy, but the rapid element has still been successfully utilized in the previous few days. If it is just process changes you have deployed, you should be good).
Control the process
If required, set up the activities you will need to control the process going forward. This could include dashboards feeding you performance data, a control chart showing you if there are any stability or capability issues with your processes or giving the reformed process an owner. These activities should not take long as you should already have the confidence and skillset to set up dashboards, control charts and assign process owners relatively quickly (and if you don’t, you may want to look into that).
Communicate out the change
Inform wider stakeholders, the business and management of the changes made, the successful delivery of your rapid process improvement and send out the completed process map. You want to make sure here that there is no confusion over the work that has been done, that the process changes do not have an adverse effect on other parts of the business and that there can be no complaints around “changes made without consultation”.
Considerations for Rapid Process Improvement
The days may be consecutive, they may not be
You can conduct your rapid process improvement over 5 consecutive days, or you can spread the days out over a couple of weeks. This is all down to personal preference and the needs of the business. If you cannot quite get the right resources in the same room over 5 consecutive days, you may need to spread this out a little. You are still going to get the benefits of a rapid approach to this work over what a usual process improvement project would look like.
Time it as necessary
It would be rare for you to need full 8-hour days to conduct this work. Some days you’ll require more time than others to get this work done, so time this out appropriately. If you are able to or need to, you could refer to day 1 as pre-work and then spread the other days out a little more, or conduct your pre-work in another week and then do a 4-day rapid stint. Either can work. In our experience, you will usually need 4 – 6 hours to conduct this work within an 8-hour day, depending on the scope of your work and the size of your process.
Acknowledge the risk
Rapid process improvement will lead to an increased risk in both the activity itself but also the outputs. You may not be utilising professional Project or Change Managers or Business Analysts here, you may not have qualified Facilitators for your workshops and you may not test or pilot the solutions you propose. All of this comes with the elevated risk that you wouldn’t necessarily have if you were conducting a fully-fledged process improvement project, therefore you must be mindful of this.
Be clear on your reasoning
Spend time really grasping why it is you want to deliver process improvements in the first place, and what the outcome you want actually looks like (time savings, waste reduction, error or risk reduction, to save money etc.) This is important as knowing this will help frame the work you do from here on it, will focus the mind around what the outputs from your workshops need to be and enable you to get the messaging across to your teams clearly.
Conclusion
Rapid process improvement is a fantastic tool that can reap huge rewards for your operational performance if delivered correctly. It is important with this approach to assess and acknowledge the risks, but also temper your and your business’s expectations. Rapid process improvement is about reducing waste, reforming or removing activities that do not add value and streamlining your process in a way which impacts your final output positively, from a quality and speed perspective. If you follow the steps laid out above, you will be sure to deliver successful process improvement, quickly.
Browse LBI Online Certification Courses